How to Set Up a New Antminer S19 Pro Miner?
You’ve just unboxed an Antminer S19 Pro—nice! This machine is a true workhorse for Bitcoin mining, known for its impressive efficiency. But let's be honest, its raw power can feel a bit intimidating. A few wrong moves, and this high-tech investment might not live up to its potential.
Don't worry, we've got you covered. This walkthrough will guide you through the entire setup process in straightforward, simple terms. We'll go from taking it out of the box to getting it hashing away on a mining pool. By the end, you'll have your miner running smoothly and confidently.
Ready to get started?
Inspect Your Antminer S19 Pro
Your Antminer S19 Pro is here! To get it running smoothly, start with a quick inspection before you plug it in.
Check the Box: Look for any major dents or tears.
Inspect the Miner: Check for cracks and make sure the fan blades are intact.
Look Inside: Peek through the vents to ensure all the silver heat sinks are straight and secure.
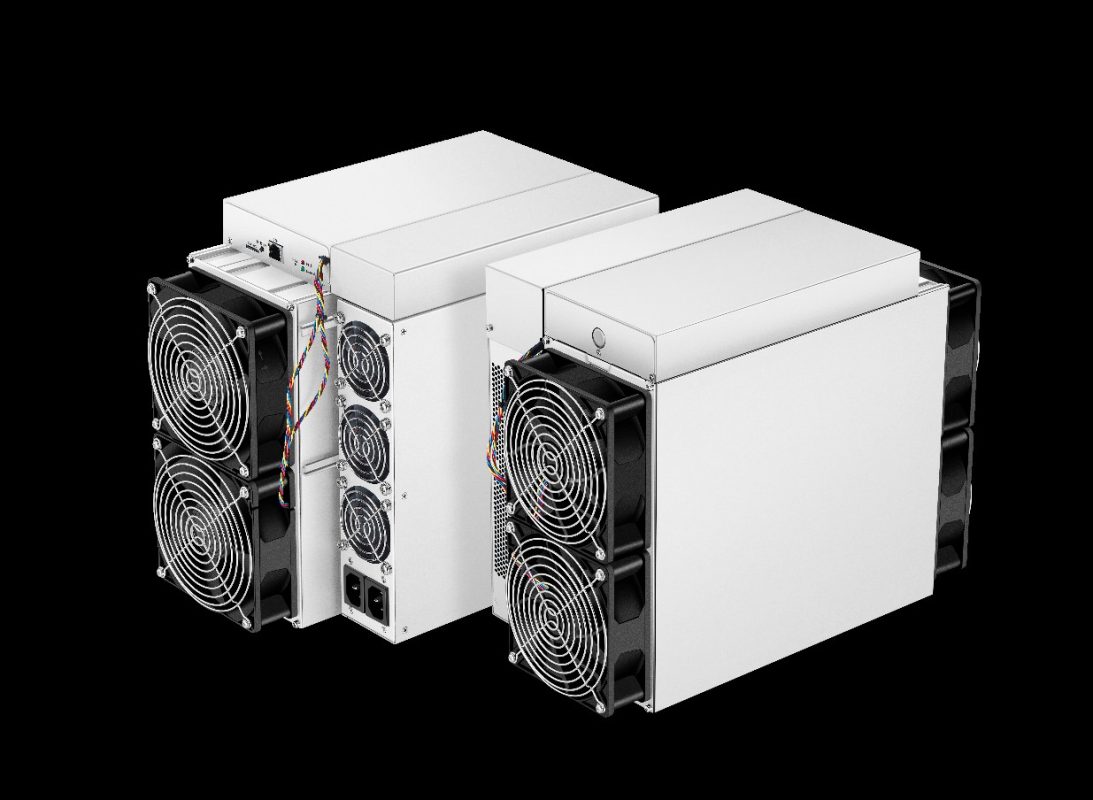
A First Look at Your Antminer S19 Pro
Before we power up your new Antminer S19 Pro, let's take a quick tour. Getting to know its physical layout will make the setup process much smoother and help you understand how it operates.
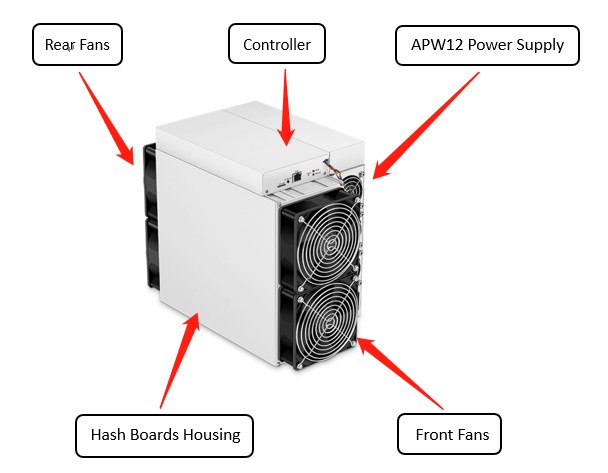
Front View
Think of the front of your miner as its "command center." This is where you'll see:
Cool Air Intake: The large fans here work like the miner's lungs, constantly drawing in cool, fresh air to keep the internal components from overheating.
Network Connection: You'll find a standard Ethernet port for connecting the miner to your local network, which is its lifeline to the blockchain.
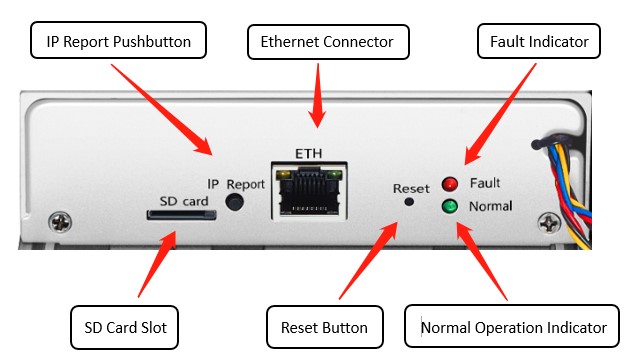
Status Indicators: A simple control panel with buttons and LED lights gives you a quick, visual read on the machine's status and health.
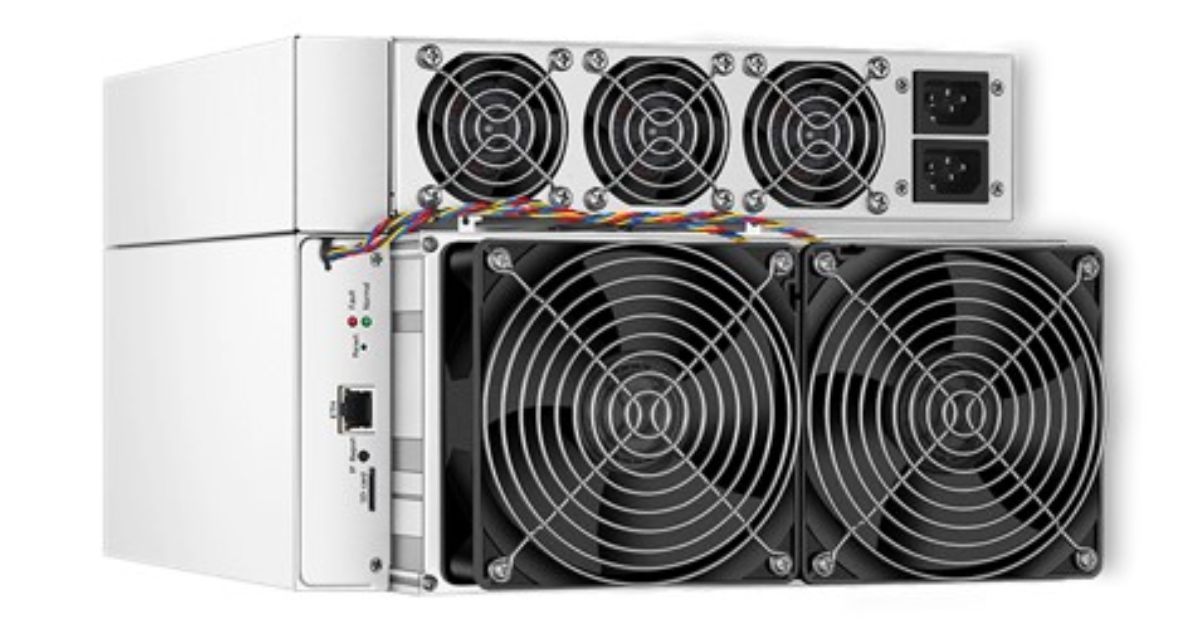
Rear View
The back of the unit is all about expelling heat, and it's just as important as the front.
Heat Exhaust: Powerful fans here blast the hot air generated by the mining process out of the machine. Proper ventilation at the back is critical.
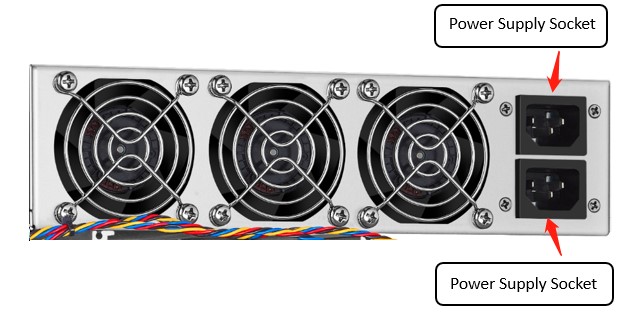
Power Up: You'll notice two separate power supply inputs. Crucially, both of these must be connected to a powered outlet for the Antminer to function. It's a dual-power system, not an optional backup.
Warning: Never yank screws or press random buttons on the casing. The “metal button” on top isn’t for you—leave it alone.
Step 1:Powering Up Your Antminer S19 Pro
To get started, you'll need two 10-amp power cords for the dual-input power supply.
Key Steps:
Plug both power cords in first.
Only then, switch the unit on.
Always use a properly grounded outlet.
Heads-up on High Altitude:
For mining above 2000 meters, expect lower efficiency. The cooling becomes less effective, causing the maximum safe operating temperature to drop by about 1°C for every 300 meters above 900m.
Step 2: Locate Your Miner on the Network
Don't worry, this is the step that trips up almost everyone at first. The good news is, Bitmain has a simple utility to make this a breeze.
Here’s how to get your miner’s attention:
Grab the Tool: Head over to Bitmain's official support website and download their "IP Reporter" utility. It'll come in a zip file.
Get it Running: After you unzip the folder, right-click the application and select "Run as Administrator". This gives it the permissions it needs to scan your network.
Pick Your Setup: The tool will ask for your configuration. Just choose "Default" if you're running one or two miners at home. (The other options are for large-scale mining farms).
Ask Your Miner for its Address: Now for the magic trick. On your physical miner, find and press the IP Report button. Hold it down for about five seconds—you’ll hear a confirming beep when it's ready.
Success! Almost instantly, the IP address assigned to your miner will appear on your computer screen. Now you know exactly where to find it!
Step 3: Accessing Your Miner's Control Panel
First, fire up your web browser—Chrome or Firefox are your best bets here. In the top address bar, carefully type in the IP address you discovered in the previous step.
This will bring you to a login screen. Don't overthink this part; for both the username and password, simply enter root.
A Quick Tip for Convenience: Your miner might grab a new IP address every time it restarts. If you'd rather not go hunting for it again, consider setting a static IP for your miner in your router's settings. It’s a one-time task that saves you a headache later.
Step 4: Telling Your Miner Where to Work
Right now, your miner is like a powerful engine that's not connected to a drivetrain. To actually start earning cryptocurrency, you need to connect it to a mining pool—a group of miners who work together to find blocks and share the rewards.
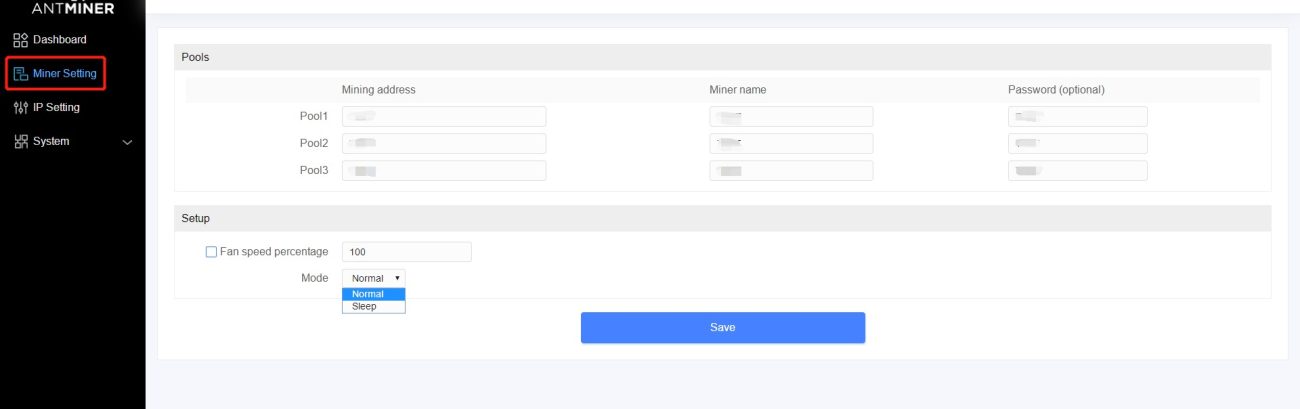
Once you're logged into the dashboard, look for a menu option labeled something like "Miner Configuration" or "Pool Settings."
Here’s the crucial info you'll need to fill in:
Pool URL: This is the address of the pool's server. It will often look something like:
stratum+tcp://btc.pool.example.com:3333Worker Name: This is your miner's unique identifier. It's typically a combination of your wallet username and a worker ID (e.g.,
YourWalletName.worker1).Password: Some pools require one, but many don't. You can often just leave this as "x" or blank if it's not mandatory.
Once all the fields are filled, hit the "Save & Apply" button. Your miner should now spring to life and start working for you.
A Friendly Suggestion: While it's simple to use Bitmain's own Antpool, you're not limited to it. It's often worth comparing other popular pools—like F2Pool, ViaBTC, or Slush Pool—as they can sometimes offer different fee structures or reward methods that might be more profitable for you.
Step 5: Monitoring Performance
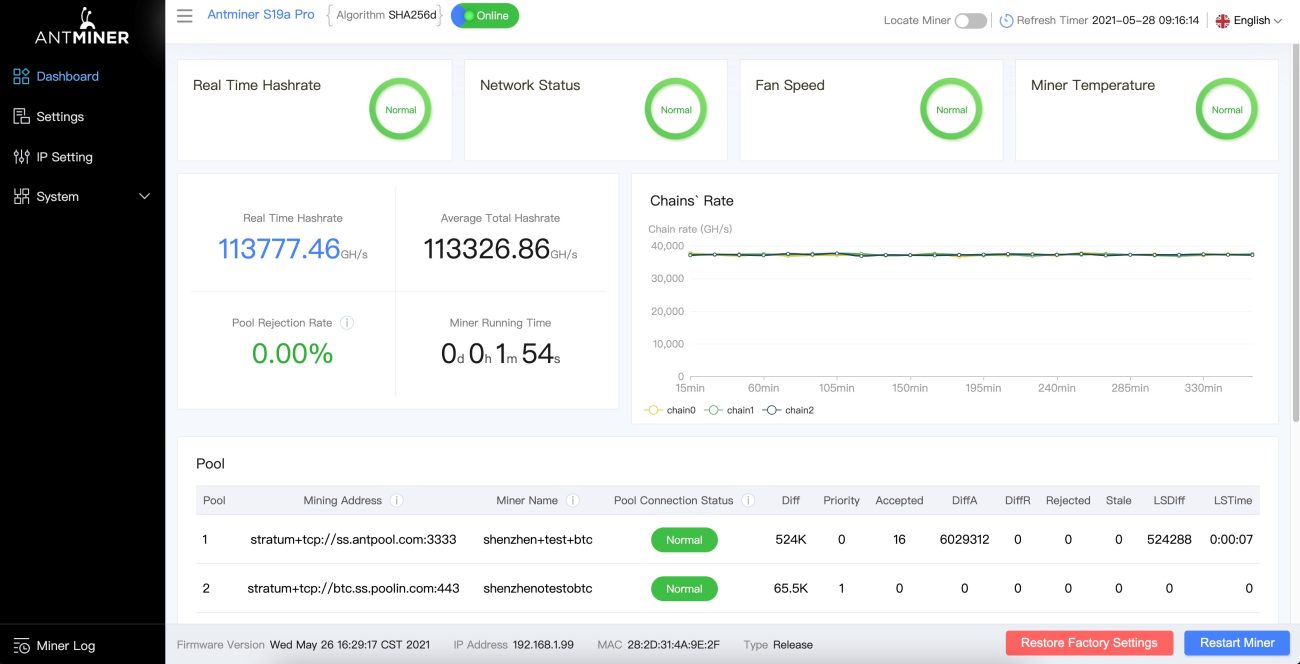
Once you’re connected to a pool, it’s time to keep tabs on your miner’s health.
Dashboard Essentials
- Real Hashrate: Your actual mining power.
- Inlet/Outlet Temp: Keep an eye—if outlet hits 95°C, the miner shuts down.
- Chip State:
✅ Green = good.
❌ Red = bad.
Don’t mess with fan speeds unless you know what you’re doing—the miner adjusts automatically.
Step 6: Quick Admin Tasks
Don't skip these—they keep your miner secure and running smoothly.
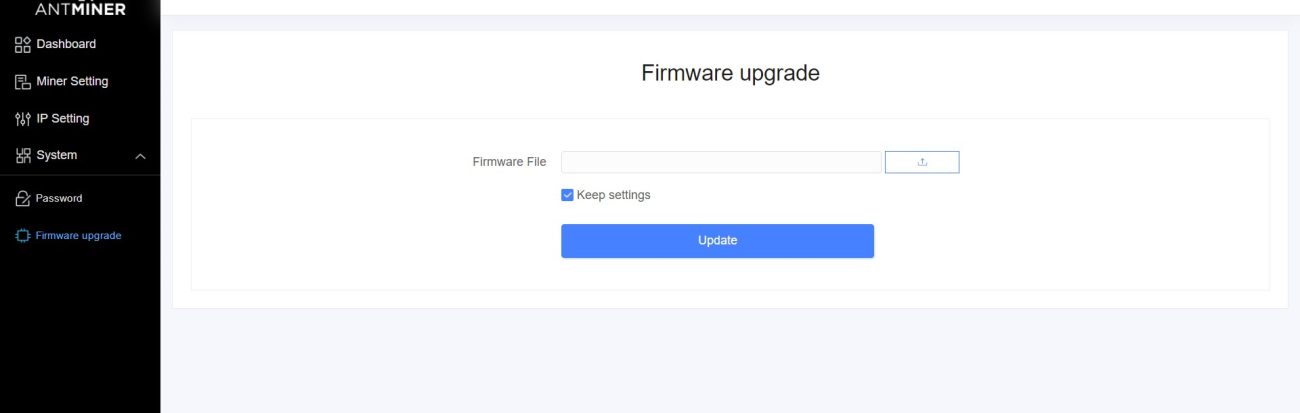
Update Firmware: Go to System > Firmware Version. Check for updates regularly for peak performance and security.
Install Upgrade: Under System > Firmware Upgrade, upload the new file. Choose to keep your settings or start fresh, then click Update.
Change Password: Always change the default! Head to System > Password to set a strong new one.
Factory Reset: If you have issues, hold the Reset button for 10 seconds after powering on. A flashing red light means it worked.
Related Article: How to Set Up Your Antminer L9 for Mining LTC and DOGE
FAQs
Q: Does the S19 Pro need special cooling?
A: Basic airflow works in cool rooms, but for warmer spots or best performance, consider extra cooling like ducting or immersion systems.
Q: What's its power draw?
A: It uses about 3250W, so a dedicated circuit is essential to avoid tripping breakers.
Q: Can I connect it with Wi-Fi?
A: No, a wired Ethernet connection is required for a stable link to the mining pool.
Q: How often to update firmware?
A: Check for updates every few months or if you notice performance issues.
Q: What happens if it overheats?
A: It has an auto-shutdown feature to prevent damage, signaling you need to improve your cooling setup.
Conclusion
Getting the most from your Antminer S19 Pro is straightforward: ensure proper cooling, provide dedicated power, and keep the firmware updated. With this simple care, your miner will be a reliable workhorse for your Bitcoin mining efforts.